Wall Soundproofing: Complete Guide to Noise Reduction & Acoustic Insulation
Wall soundproofing is the most effective way to eliminate unwanted noise, enhance privacy, and create a peaceful environment in your home or office. Whether you are dealing with loud neighbors, street traffic, or noisy machinery, understanding the principles of wall soundproofing empowers you to block sound transmission effectively. True acoustic insulation requires more than just hanging foam panels. It relies on the science of mass, decoupling, and damping. This comprehensive guide explores proven methods, essential materials like mass loaded vinyl and resilient channels, and step-by-step techniques to help you achieve maximum decibel reduction and lasting quiet.
What is Wall Soundproofing and How Does It Work?
Sound travels through the air as invisible waves. When these waves hit a wall, they cause the wall structure to vibrate. The wall then radiates these vibrations into the room on the other side. This is called sound transmission.
Soundproofing walls works by interrupting this vibration pathway. To stop sound, you must address how it moves. There are three core principles of acoustic design that dictate how well a wall blocks sound: Mass, Decoupling, and Damping.
Understanding Sound Transmission Class (STC)
Before starting a wall soundproofing project, you need to measure the problem. Sound Transmission Class (STC) is the rating system used to measure how well a wall assembly blocks airborne sound.
- STC 25 to 30: Normal speech is easily heard and understood.
- STC 35 to 40: Loud speech is heard but not easily understood.
- STC 45 to 50: Loud speech is barely audible.
- STC 55+: Loud sounds are effectively blocked.
A standard interior wall with 1/2-inch drywall on both sides and no acoustic insulation typically has an STC rating of 33. Effective wall soundproofing aims to raise this rating to 50 or higher.
The Three Pillars of Sound Dampening
- Mass: Heavy, dense materials block sound waves. Adding mass to a wall makes it harder for sound waves to vibrate the structure.
- Decoupling: Sound travels easily through solid connections. Decoupling breaks the physical path between the two sides of the wall. If the drywall on one side is not touching the drywall on the other side, sound vibrations cannot pass directly through.
- Damping: Damping absorbs vibrational energy and converts it into a tiny amount of heat. This stops the wall from ringing like a drum, drastically reducing sound transmission at lower frequencies.
Top Methods for Wall Soundproofing
There is no single magic bullet for soundproofing walls. The best results come from combining multiple methods. Here are the most effective techniques used by acoustic professionals.
Adding Mass Loaded Vinyl (MLV)
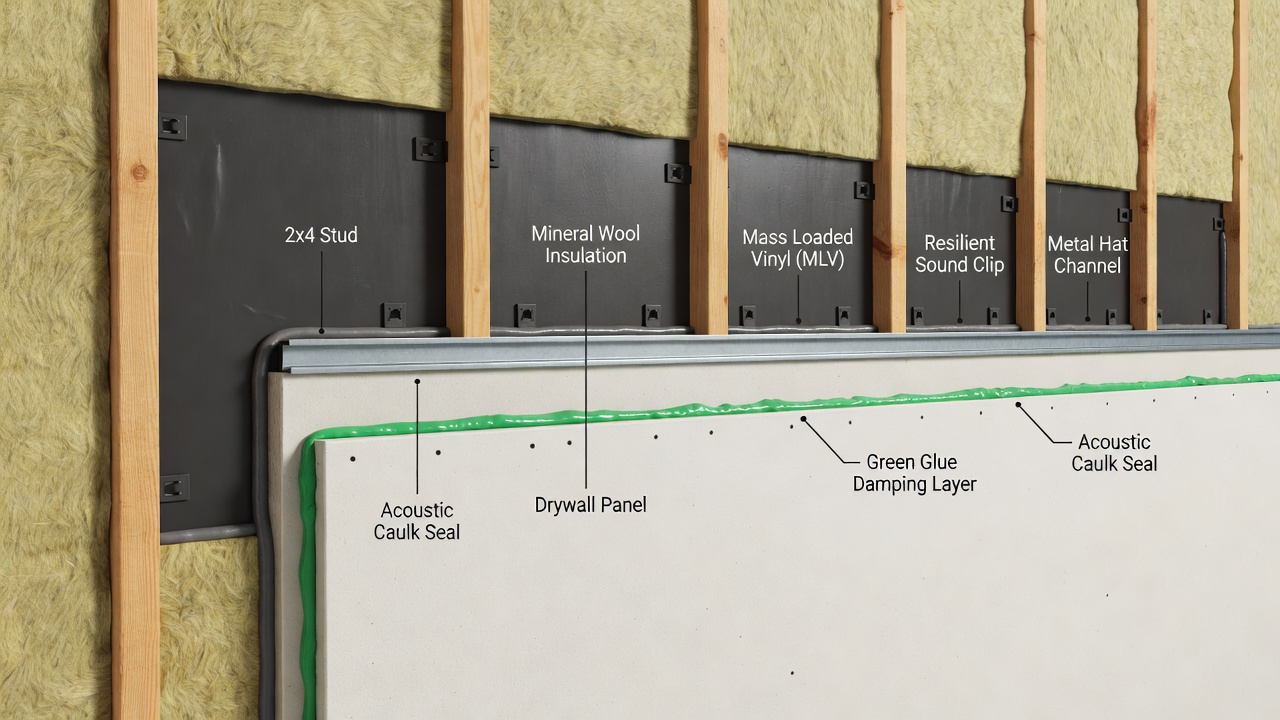
Mass loaded vinyl is a heavy, flexible, lead-free material that adds massive density to a wall without taking up much space. A standard 1/8-inch thick sheet weighs about one pound per square foot.
MLV is excellent for wall soundproofing because it is limp. Stiff materials resonate easily, but limp materials resist vibration. You can install MLV directly over existing drywall before adding a second layer, or staple it to studs during new construction. It is highly effective at blocking mid to high-frequency sounds.
Installing Resilient Channels and Sound Clips
This is the most common method for decoupling a wall. Resilient channels are thin, metal tracks that attach horizontally to the wall studs. You then screw the drywall into the channels instead of directly into the studs.
This creates a small air gap and breaks the mechanical connection. Sound waves hit the drywall but cannot travel directly to the studs and into the next room. For even better performance, use sound isolation clips (hat clips) combined with a metal hat channel. These clips feature a rubber bushing that absorbs vibrations, offering superior decibel reduction compared to standard resilient channels.
Applying Damping Compounds (Green Glue)
Green Glue is the industry standard for damping. It is a viscoelastic compound applied between two layers of rigid material, like drywall.
You apply it in a zigzag pattern to the back of the new drywall sheet before screwing it over the existing wall. When sound waves cause the walls to vibrate, the Green Glue layer shears. This shearing action absorbs the acoustic energy and converts it to heat. Green Glue is incredibly effective at blocking low-frequency noises like bass music and footsteps.
Upgrading Acoustic Insulation
Swapping standard fiberglass batts for dense acoustic insulation improves sound absorption. Products like mineral wool (Rockwool) or fiberglass acoustic batts (Owens Corning 703) are much denser than standard pink insulation.
They trap air and absorb sound waves that pass through the wall cavity. However, acoustic insulation alone is not a complete solution. It works best when combined with mass and decoupling. Never compress acoustic insulation into the cavity. It relies on trapped air to function properly.
Step-by-Step Guide to Soundproofing an Existing Wall
If you live in an existing home and cannot tear down the walls to the studs, you can still achieve significant noise reduction. Here is the best approach for retrofit wall soundproofing.
- Inspect and Seal Gaps: Sound leaks through the smallest cracks. Remove outlet covers and inspect for gaps. Use acoustic caulk to seal any spaces around the outlet boxes, plumbing penetrations, and the perimeter of the wall where it meets the floor and ceiling.
- Install Mass Loaded Vinyl: Cut MLV to fit the wall. Use a heavy-duty staple gun or nails with large fender washers to attach it to the drywall. Tape the seams with vinyl tape to create a continuous sound barrier.
- Apply Green Glue and Drywall: Apply Green Glue Noiseproofing Compound to the back of a new layer of 5/8-inch Type X drywall. Screw the new drywall directly into the existing wall (or studs if you removed the old drywall). The Green Glue creates the vital damping layer.
- Seal the Edits and Paint: Once the new drywall is up, tape the seams with drywall mud. Run a thick bead of acoustic caulk around the top, bottom, and side perimeters of the new drywall before installing baseboards. Paint as desired.
How to Soundproof a Wall During New Construction
Building a new wall gives you the ultimate advantage. You can design the assembly from the ground up for maximum acoustic performance.
Build a Double Staggered Stud Wall
The most effective decoupling method is building a double wall. You use a wider bottom plate (like a 2×6). You build one row of studs on the outer edge of the plate, and a second row on the inner edge.
The drywall on one side attaches only to the outer studs. The drywall on the other side attaches only to the inner studs. The two sides of the wall never touch. Fill the deep cavity with thick mineral wool insulation. This method yields incredibly high STC ratings.
Use Resilient Sound Clips and Hat Channels
If space is limited and you cannot build a double wall, use sound isolation clips. Attach the clips to the studs. Snap a metal hat channel into the clips. Screw the drywall to the hat channel. Remember to use the correct screws. “Short circuiting” occurs if you accidentally use a screw long enough to hit the stud behind the clip. This ruins the decoupling effect.
Essential Materials for Soundproofing Walls
Do not overlook the small details. The best wall soundproofing system will fail if you ignore penetrations and seams.
Acoustic Caulk and Sealants
Standard caulk hardens over time and can crack, allowing sound to leak. Acoustic caulk remains permanently flexible. It absorbs vibrations and seals gaps. You must use it around electrical boxes, light switches, and the perimeter of the wall.
Acoustic Putty Pads
Electrical outlet boxes are massive weak points in a wall. They are essentially holes in your sound barrier. Acoustic putty pads are thick, sound-dampening pads that wrap around the back of the electrical box. They seal the box and prevent sound from bleeding through the outlet.
Solid Core Doors
Even if your wall has an STC rating of 60, a hollow-core bedroom door will ruin the entire system. Hollow doors have an STC of about 20. Upgrade to a solid-core wood door, which naturally blocks much more sound. Remember to weatherstrip the door frame and use a door sweep at the bottom.
Common Wall Soundproofing Mistakes to Avoid
Many people waste money on soundproofing because they fall for common pitfalls. Avoid these critical errors.
Relying on Acoustic Foam Panels
Foam panels and egg cartons are for acoustic treatment, not soundproofing. They reduce echo inside a room. They do absolutely nothing to block sound from entering or leaving a room. Sound passes right through foam.
Ignoring Flanking Paths
Sound is like water. It will find any path of least resistance. If you soundproof the wall but ignore the ceiling, floor, or HVAC vents, sound will simply flank over or under the wall. You must treat the entire room as a system.
Short Circuiting Decoupled Walls
If you use resilient channels or sound clips, you must be careful with drywall screws. If a screw pierces the drywall and hits a wooden stud, it creates a solid mechanical bridge. This completely destroys the decoupling effect you paid for. Always use the correct screw length specified by the manufacturer.
Forgetting the Outlets
Two back-to-back electrical outlets on opposite sides of a wall act as an open window for sound. Always offset outlet boxes so they are staggered between different stud cavities. Wrap them in putty pads.
Conclusion: Achieving Peace and Quiet with Wall Soundproofing
Living with intrusive noise is frustrating and stressful. However, you do not have to just live with it. By applying the proven principles of mass, decoupling, and damping, wall soundproofing can transform your space into a quiet, comfortable retreat. Whether you are retrofitting an existing apartment with mass loaded vinyl and Green Glue, or building a new studio with staggered studs and resilient channels, a layered approach is the key to success. Do not forget the crucial details. Seal every gap with acoustic caulk, protect your outlets with putty pads, and avoid short circuits. Invest in proper wall soundproofing today, and enjoy the profound benefits of true peace and quiet.
Frequently Asked Questions (FAQs)
1. How can I soundproof a wall cheaply?
The cheapest way to improve noise reduction is to seal all gaps and cracks with acoustic caulk, add mass by hanging heavy sound-dampening blankets, and install acoustic putty pads behind outlet boxes.
2. Does acoustic insulation alone soundproof a wall?
No, acoustic insulation like mineral wool absorbs sound in the cavity but does not block it entirely; it must be combined with mass (drywall/MLV) and decoupling for effective soundproofing.
3. What is Mass Loaded Vinyl (MLV) used for?
MLV is a dense, flexible material added to walls and ceilings to increase mass without adding thickness, making it highly effective at blocking airborne sound transmission.
4. How does Green Glue work to reduce noise?
Green Glue is a damping compound applied between layers of drywall; it converts sound vibration energy into tiny amounts of heat, significantly reducing low-frequency noise like bass.
5. Can I soundproof a shared wall without removing drywall?
Yes, you can apply Mass Loaded Vinyl directly over the existing wall, add a new layer of drywall with Green Glue in between, and thoroughly seal all edges with acoustic caulk.
6. What is a resilient channel?
A resilient channel is a metal track installed across wall studs to decouple the drywall from the framing, breaking the mechanical pathway so sound vibrations cannot transfer easily.